
How to Change the Handing on Your Superlock 2.0 Gate Lock
Our Superlock 2.0 Code range is now supplied with reversible handing, making it easier to order, stock, and install the correct lock for each gate. Before installing the lock on the gate, it is important to know which hand you need.
Handing refers to the side on which the gate is hinged. This determines whether the lock should be set for left-hand or right-hand installation. When standing outside the gate, if the hinges are on the left, the lock must be changed to the left-hand setting. Our gate locks come right-handed as standard, so if you need a right-handed gate lock for your gate, you can simply proceed to follow the installation instructions.
Handing is important because the lock latch must operate in the correct direction for the gate to close and secure properly. If the lock is set to the wrong handing, the latch may not engage correctly with the keep, the gate may not close smoothly, or the lock may not secure as intended. Setting the correct handing before installation helps ensure the lock works smoothly, aligns with the keep and provides the intended level of security.
The handing can be switched in a few simple steps before installation, or after if necessary. The guide explains how to change the handing for each Superlock 2.0 Code gate lock out of the box. Simply find your product below and follow the step-by-step instructions.
BDGS- Superlock 2.0 Code Single-Sided
Use the steps below to switch the handing on the BDGS Superlock 2.0 Code Single-Sided lock before installation.
How to switch the handing on the BDGS
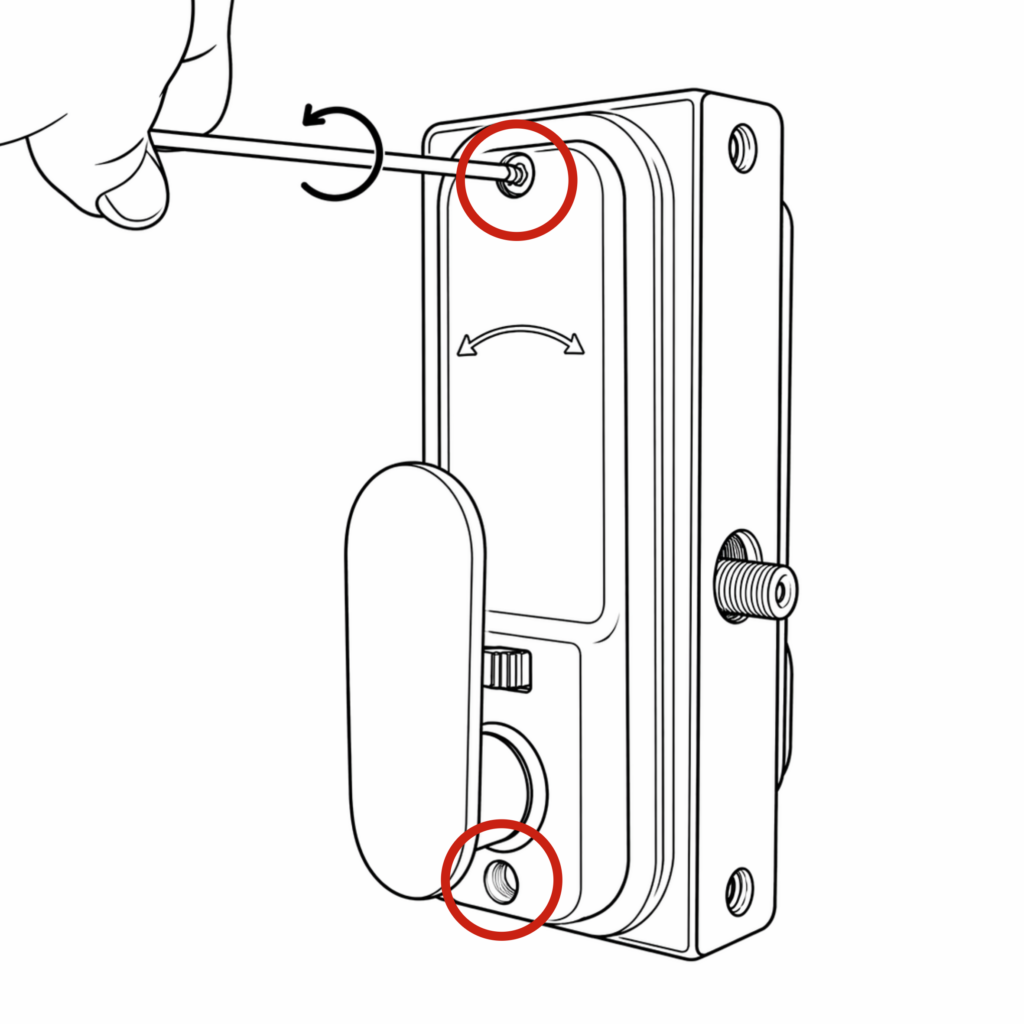
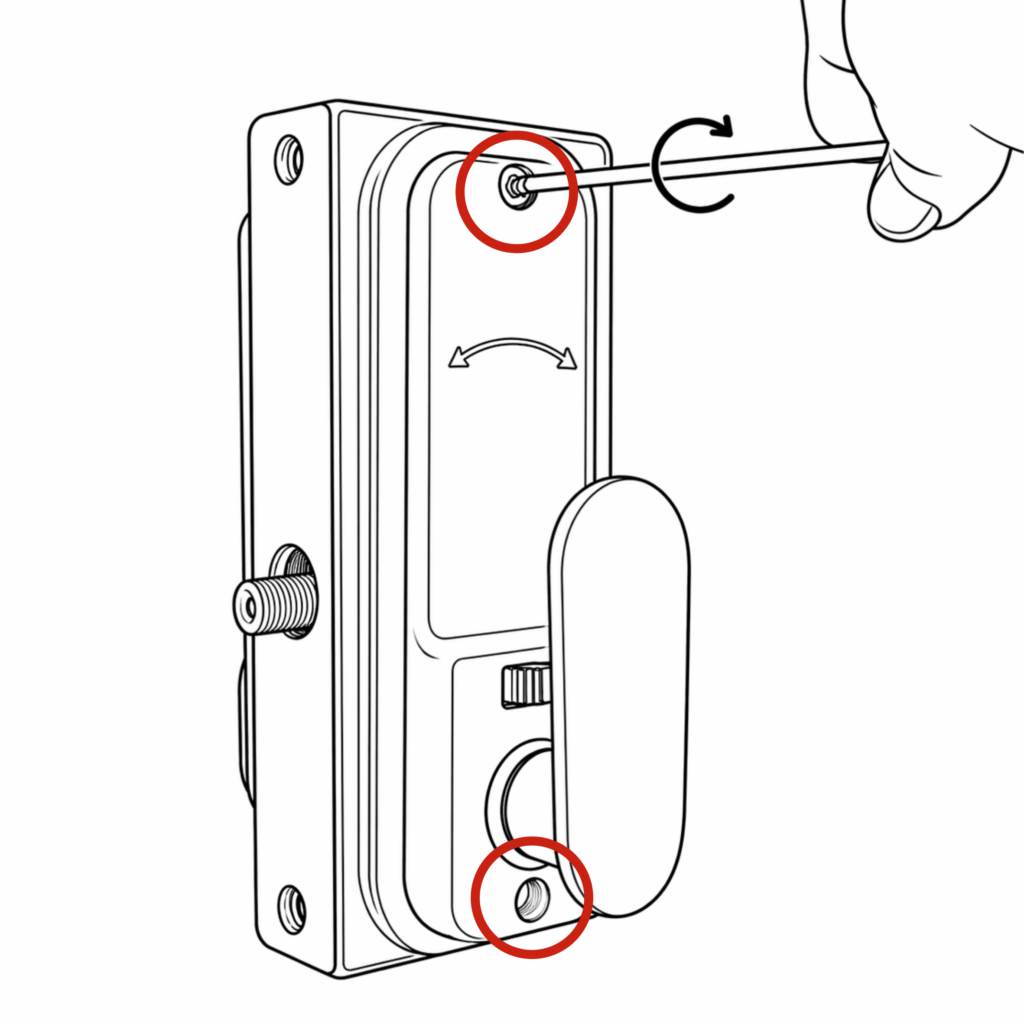
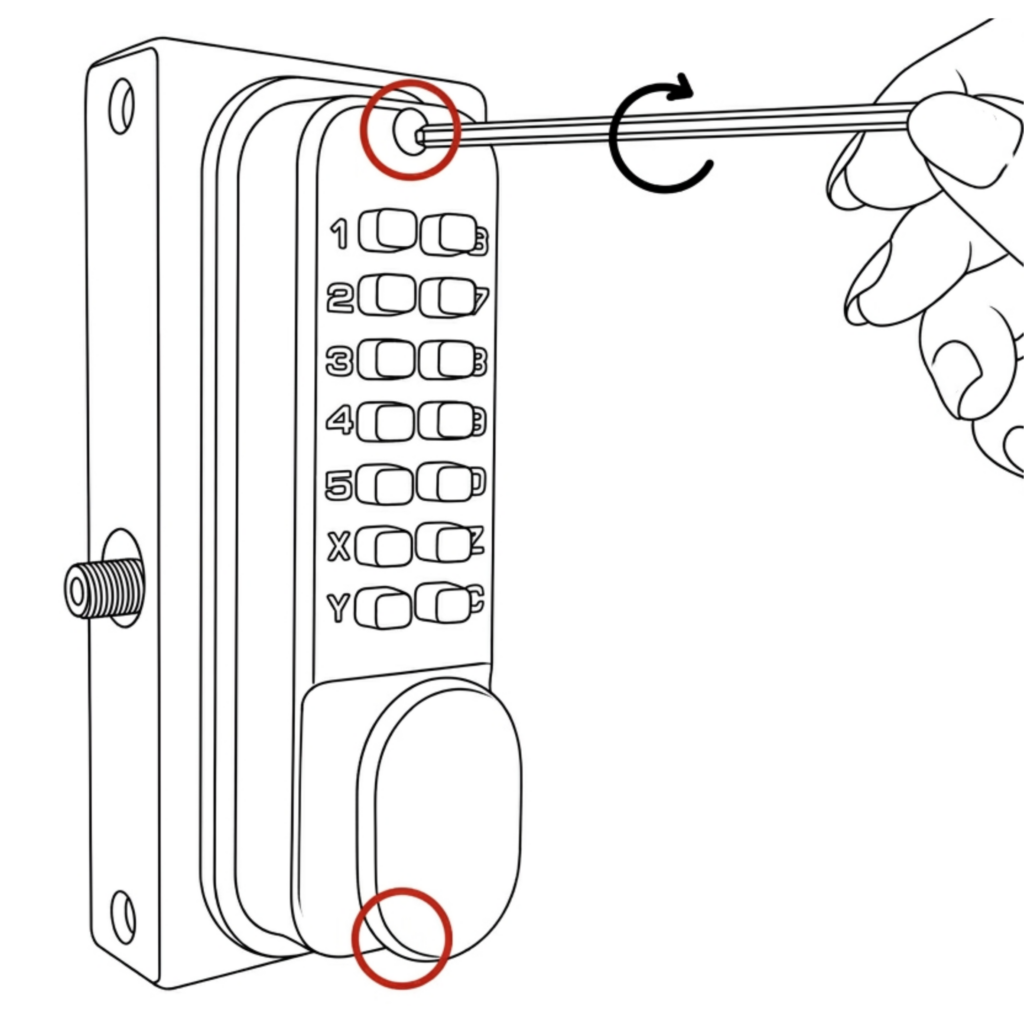
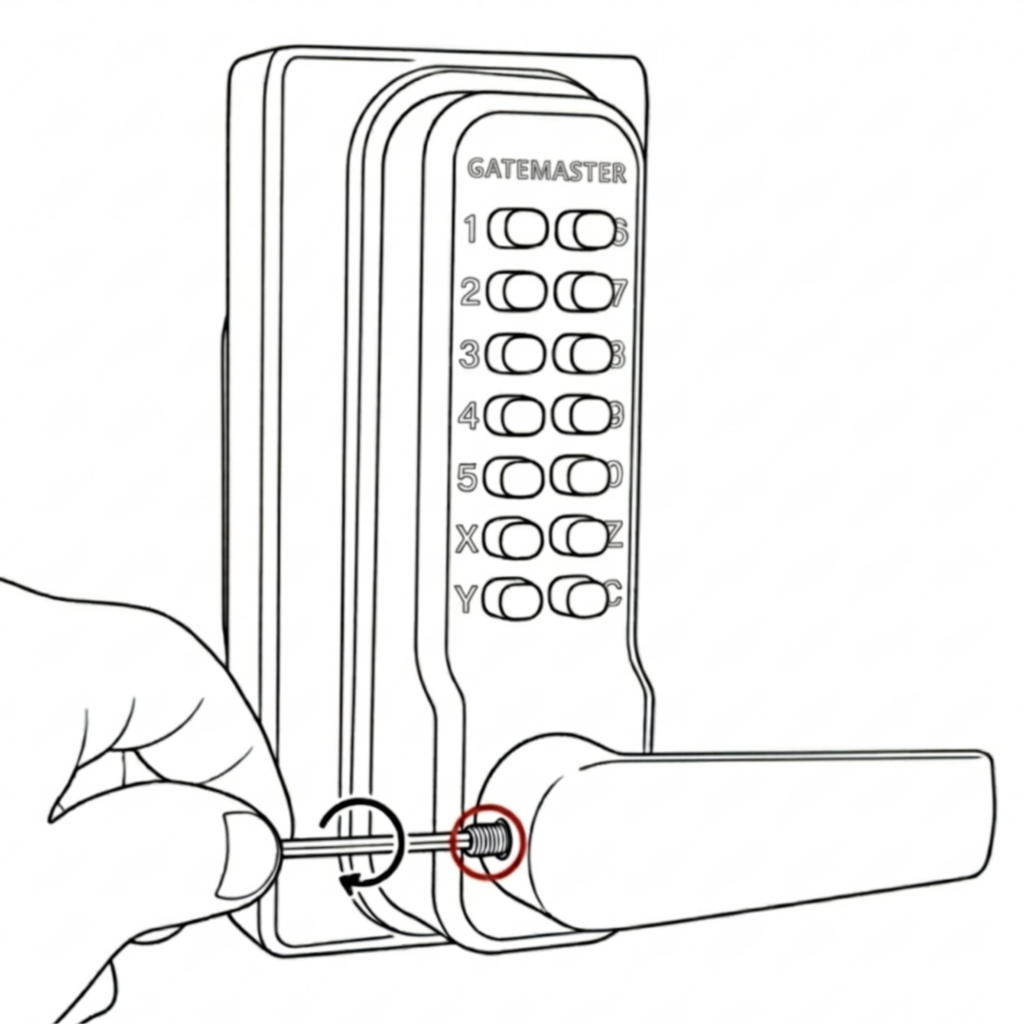
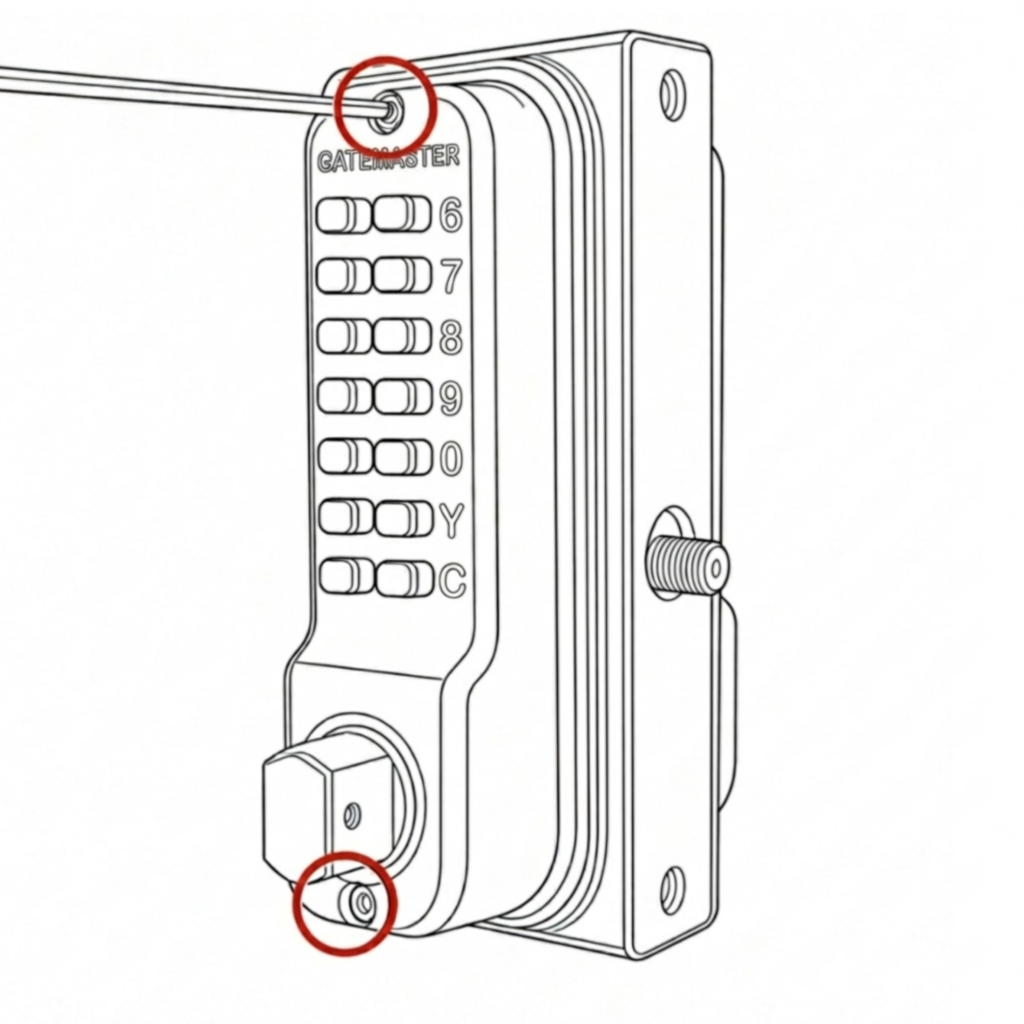
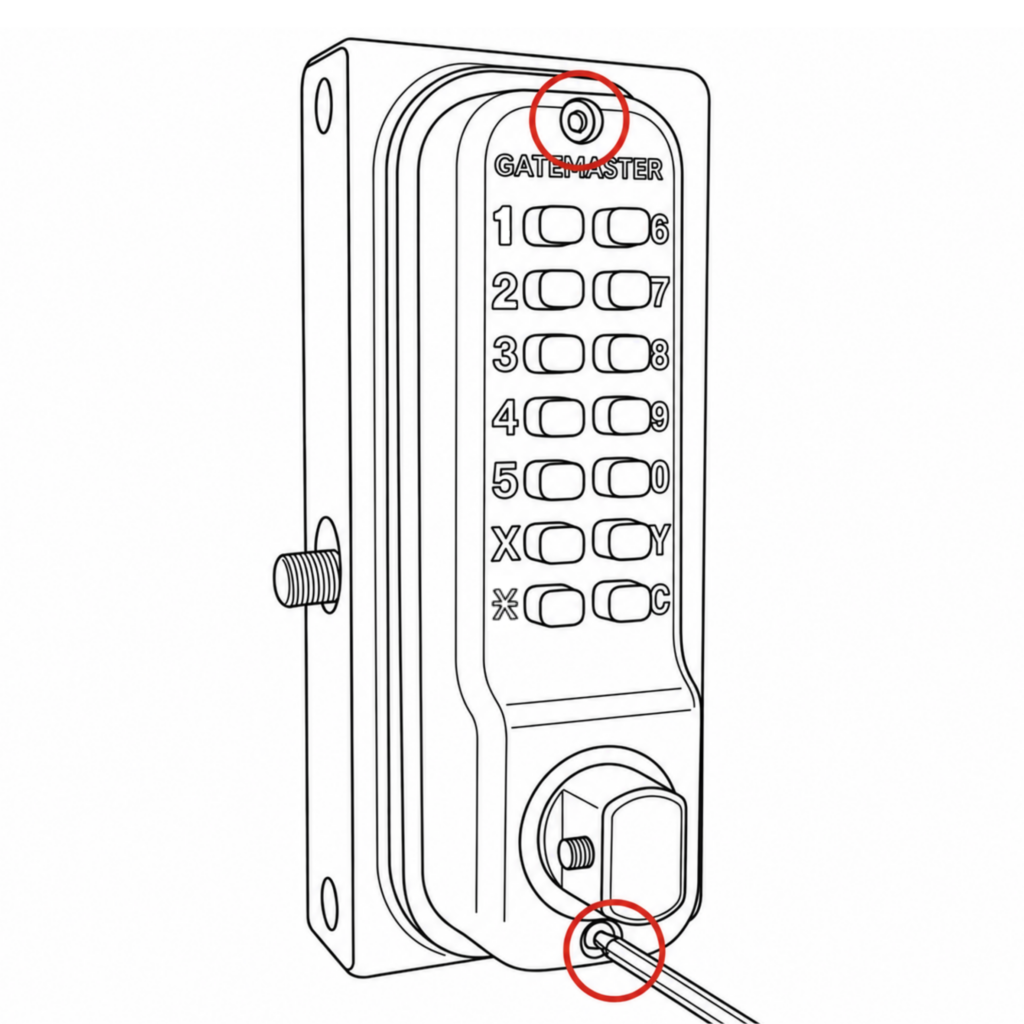
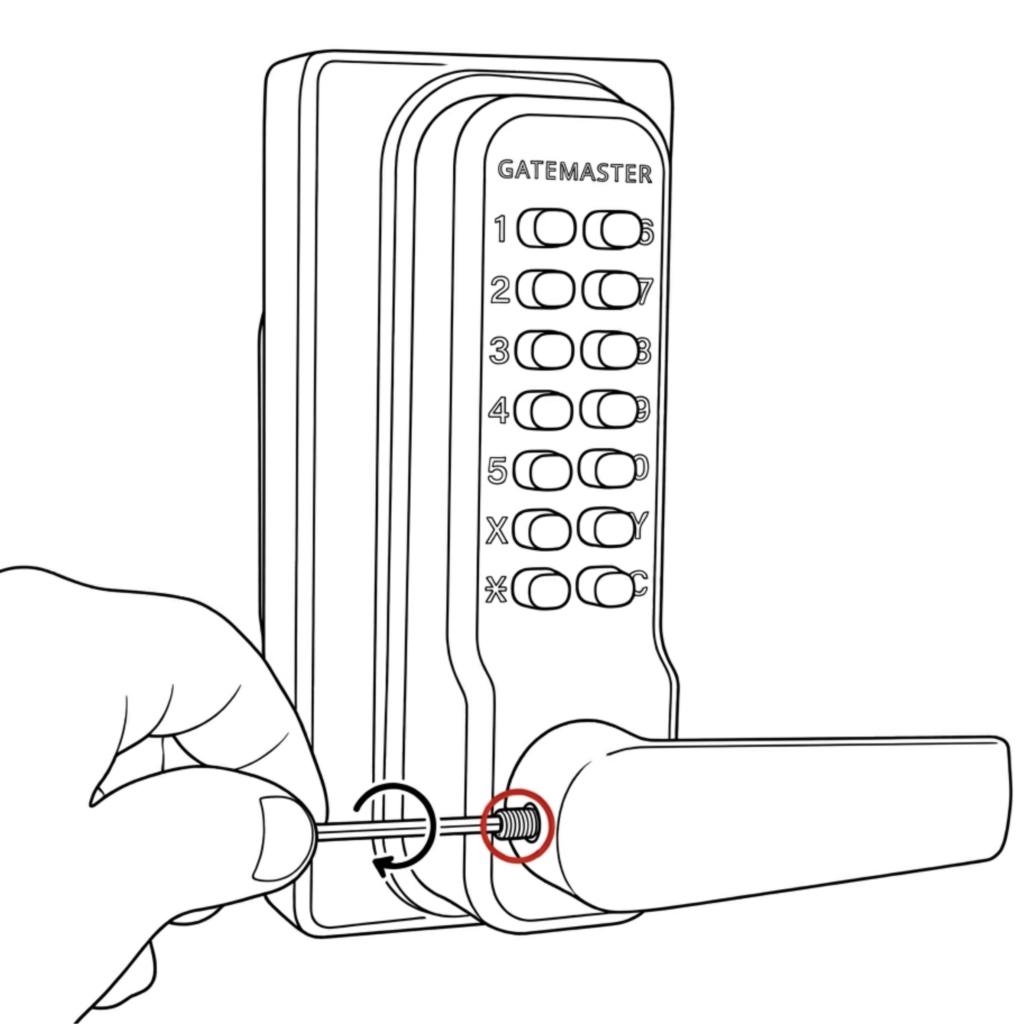
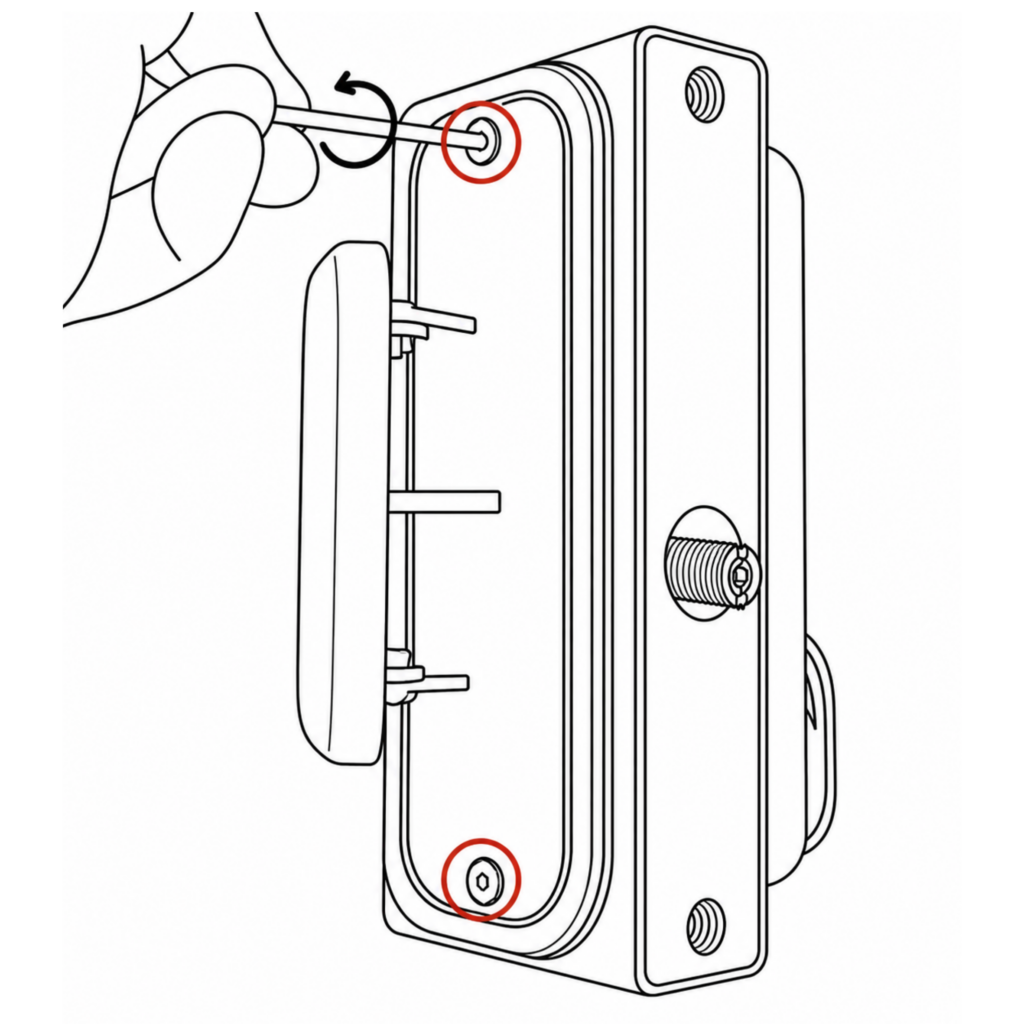
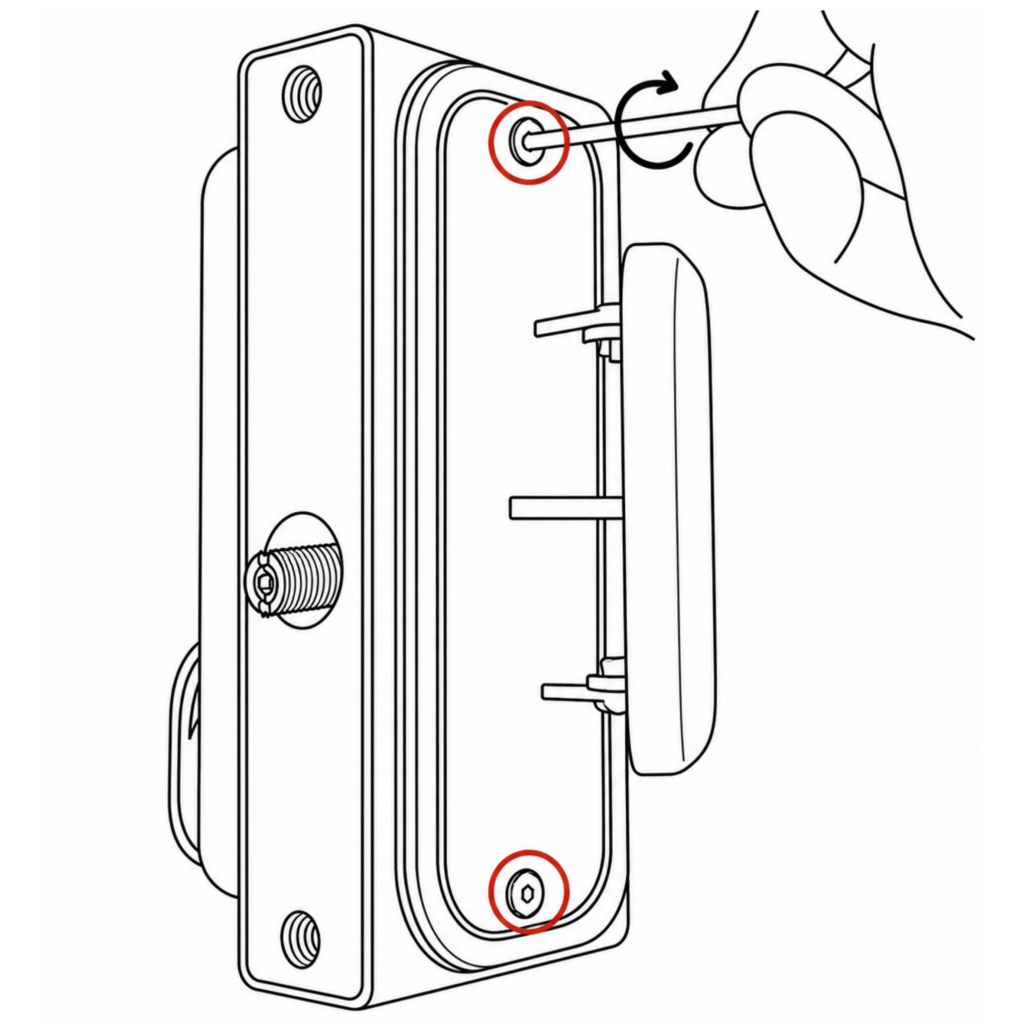
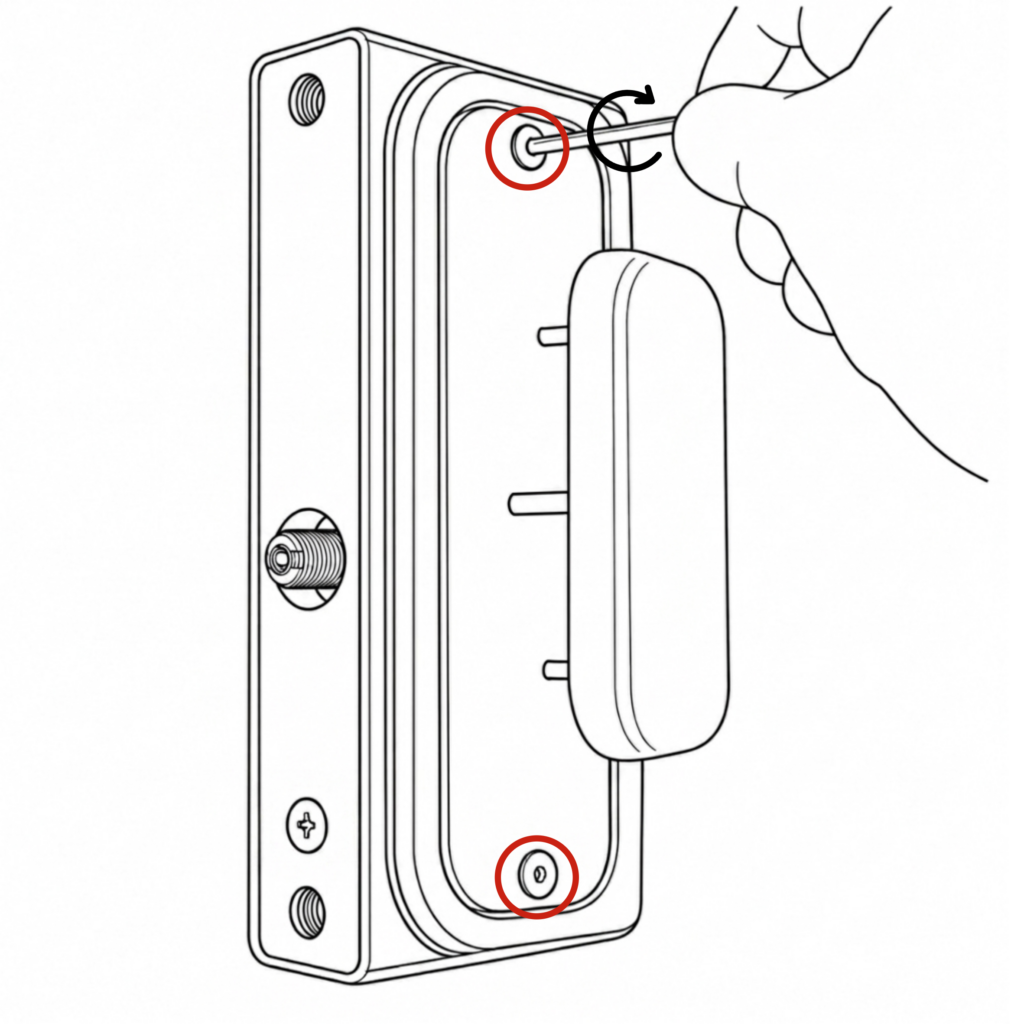
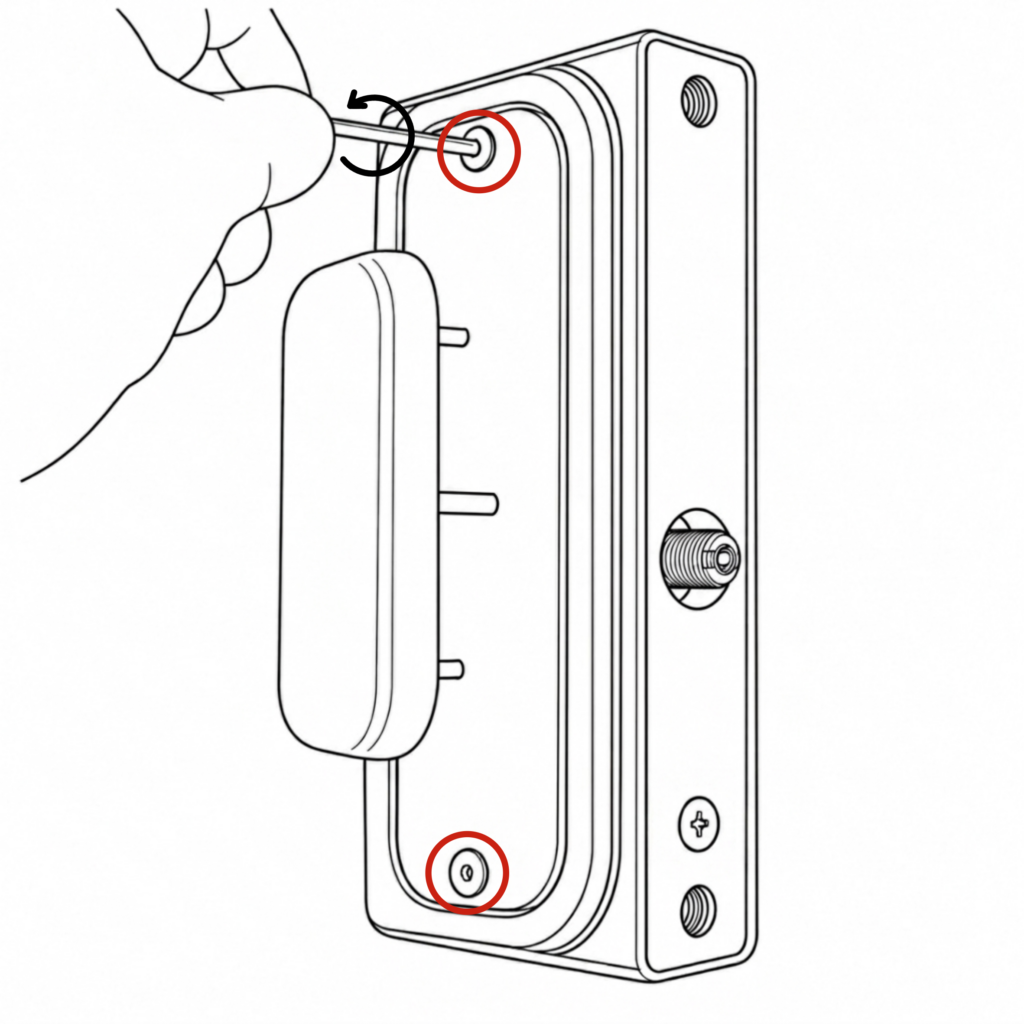
- Using the 3mm hex key, unscrew the two screws located at the top and bottom of the lock. Remove the keypad.

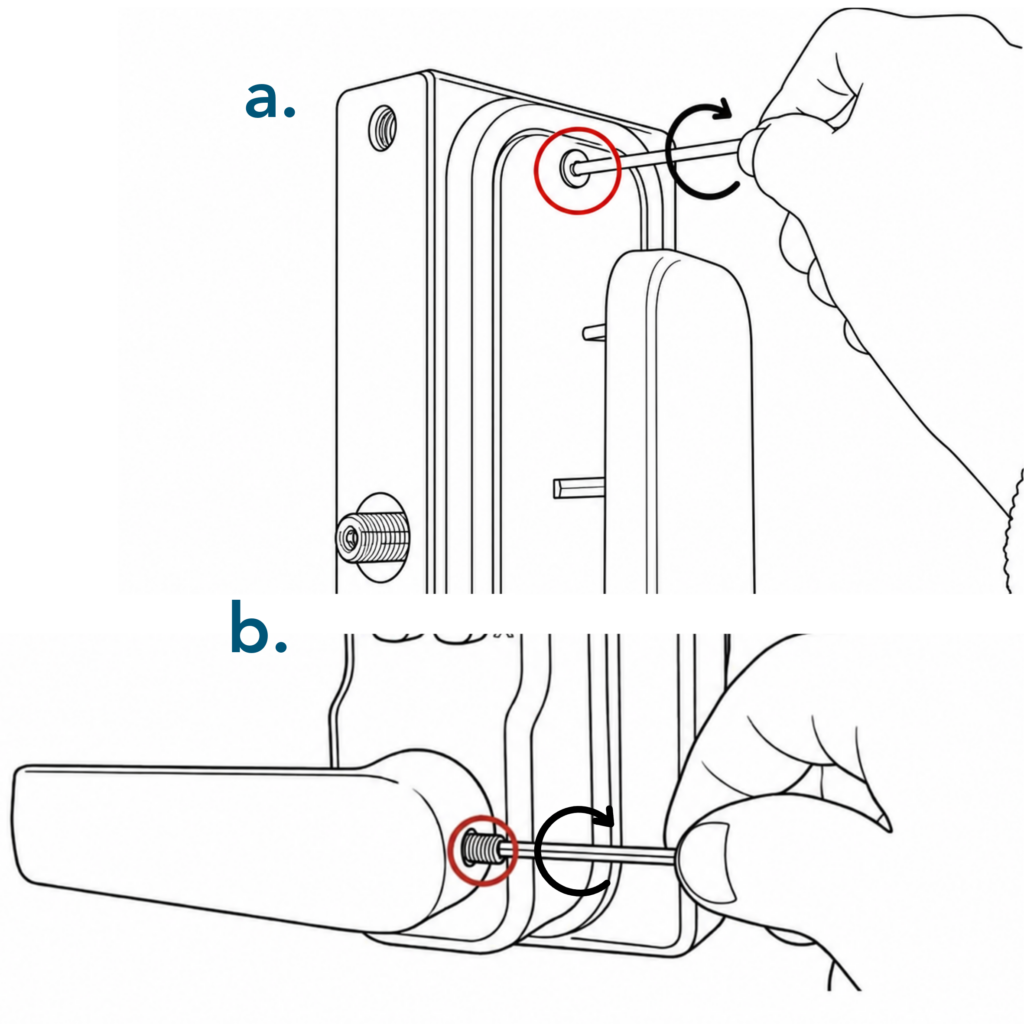
2. On the inside handle, unscrew only the blue screw and screw it into the adjacent hole.
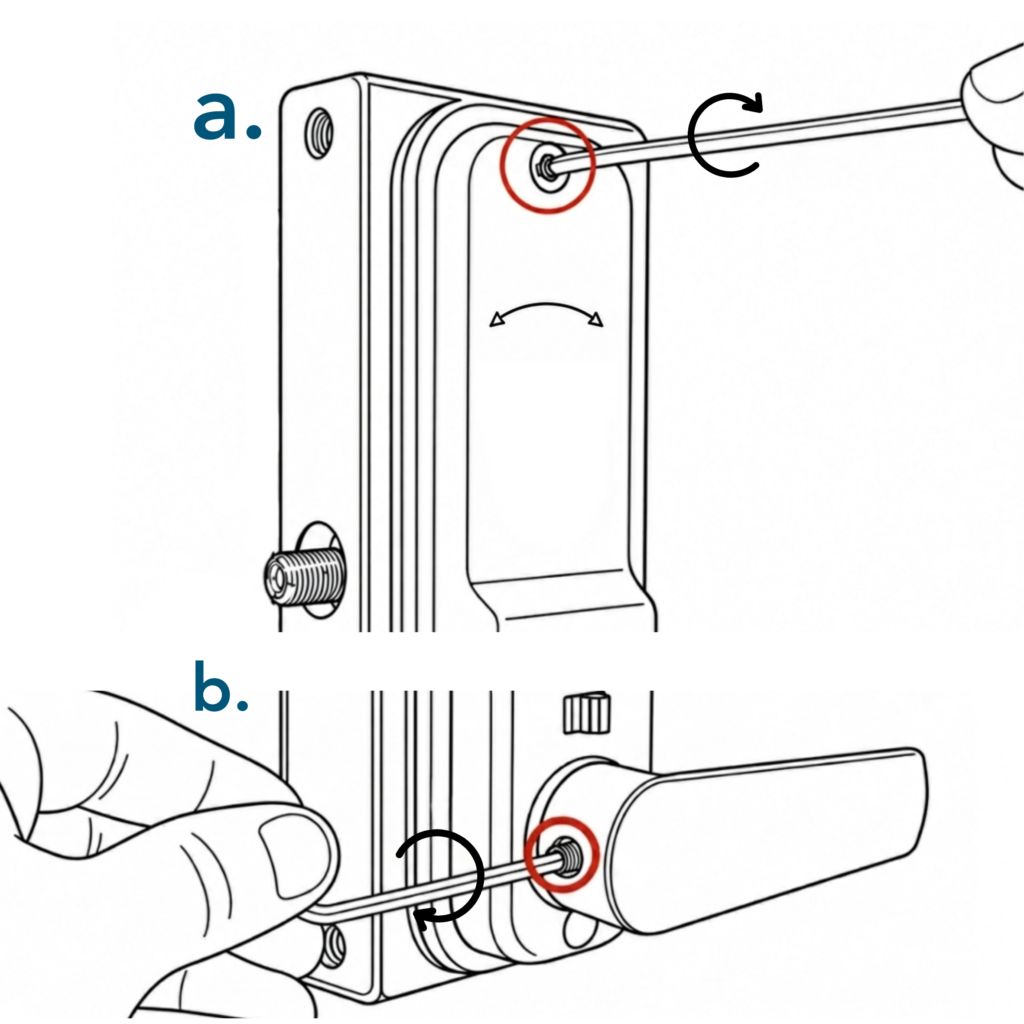
For left-handing, the screw should be in the right hole (image B) and for right-handing the screw should be in the left hole (image A).
3. Refit the keypad on the correct side using the 3mm hex key, ensuring that the flat spindle and rubber gaskets are in place.
Once complete, check that the code and handle work correctly. Then follow the main installation instructions to fit the lock onto the gate.
BDG- Superlock 2.0 Code Double-Sided
Use the steps below to switch the handing on the BDG Superlock 2.0 Code Double-Sided lock before installation.
Make sure that after you change the handing that the keypad with screws is located on the inside of the gate for the lock to remain secure.
How to switch the handing on the BDG
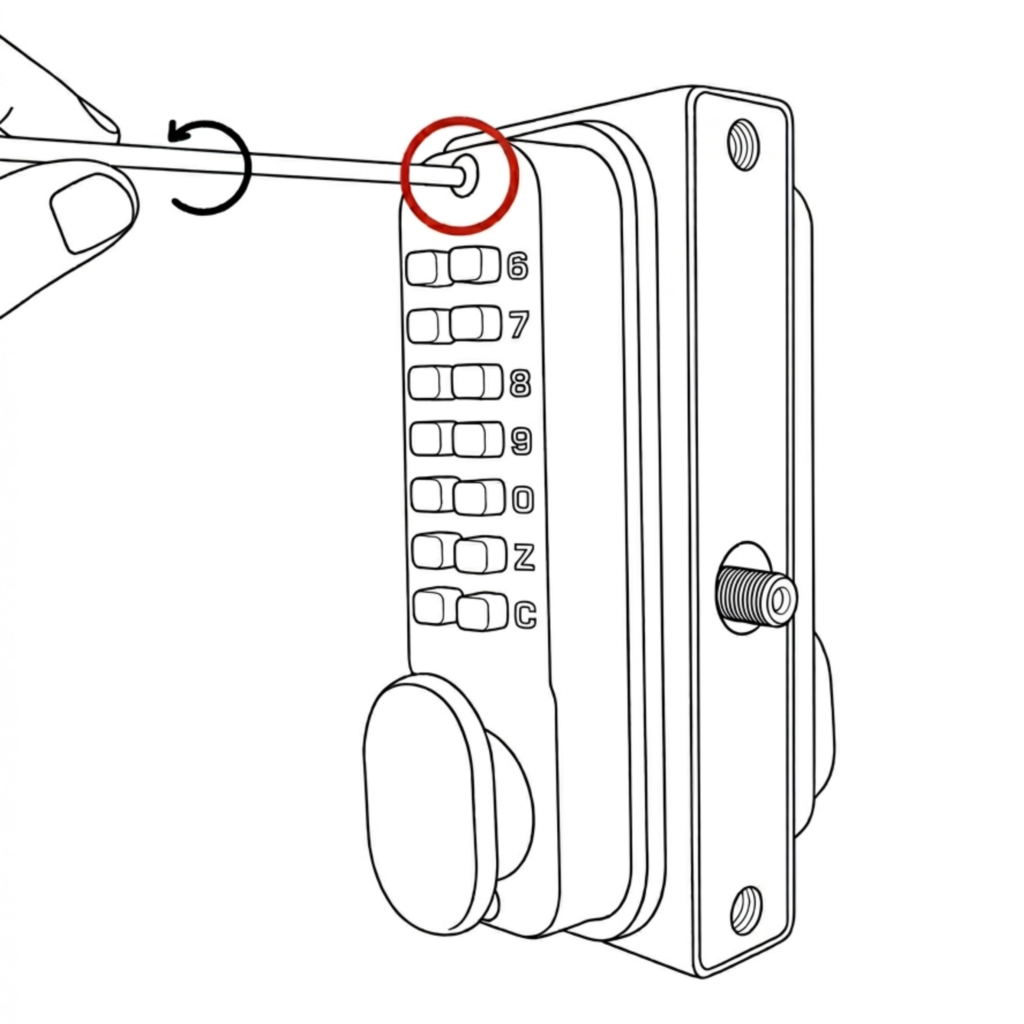
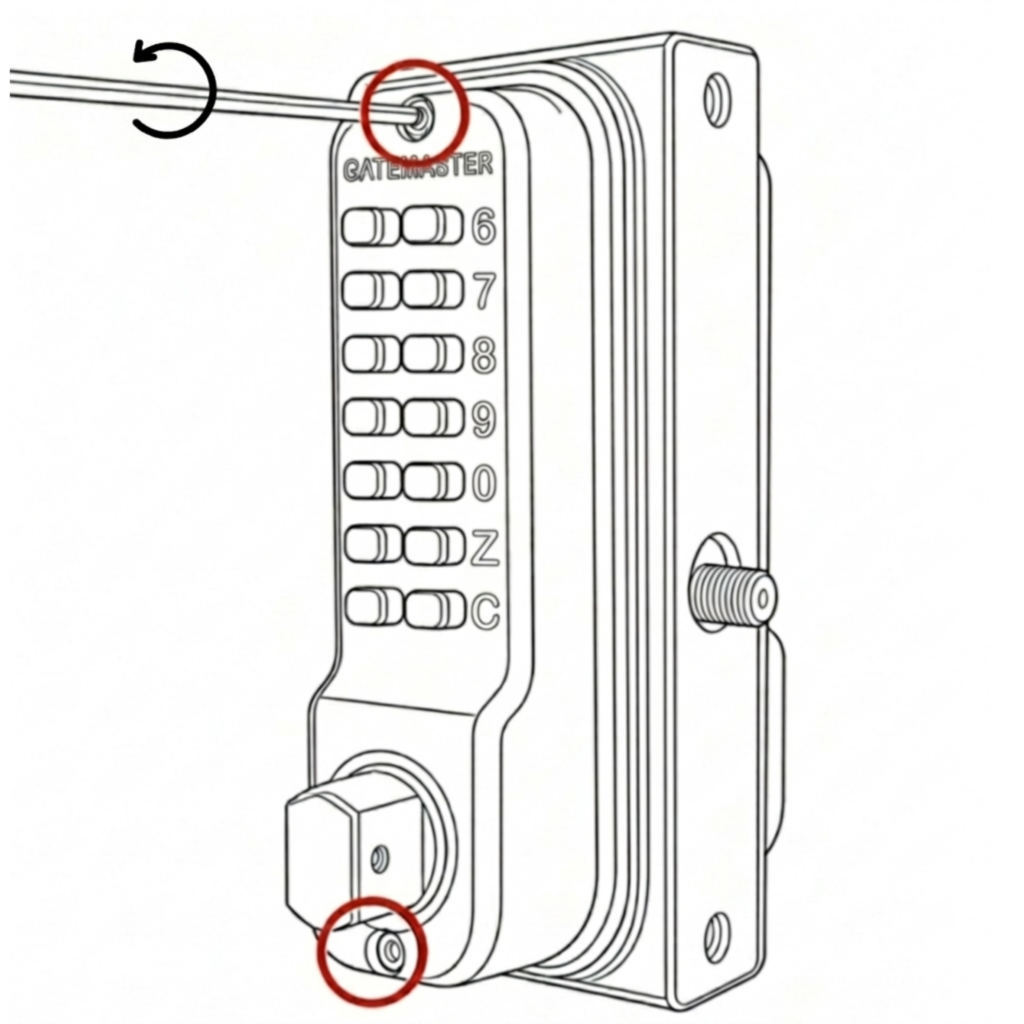
- Use the 3mm hex key, unscrew the top screw of the inside keypad. Remove the keypads.
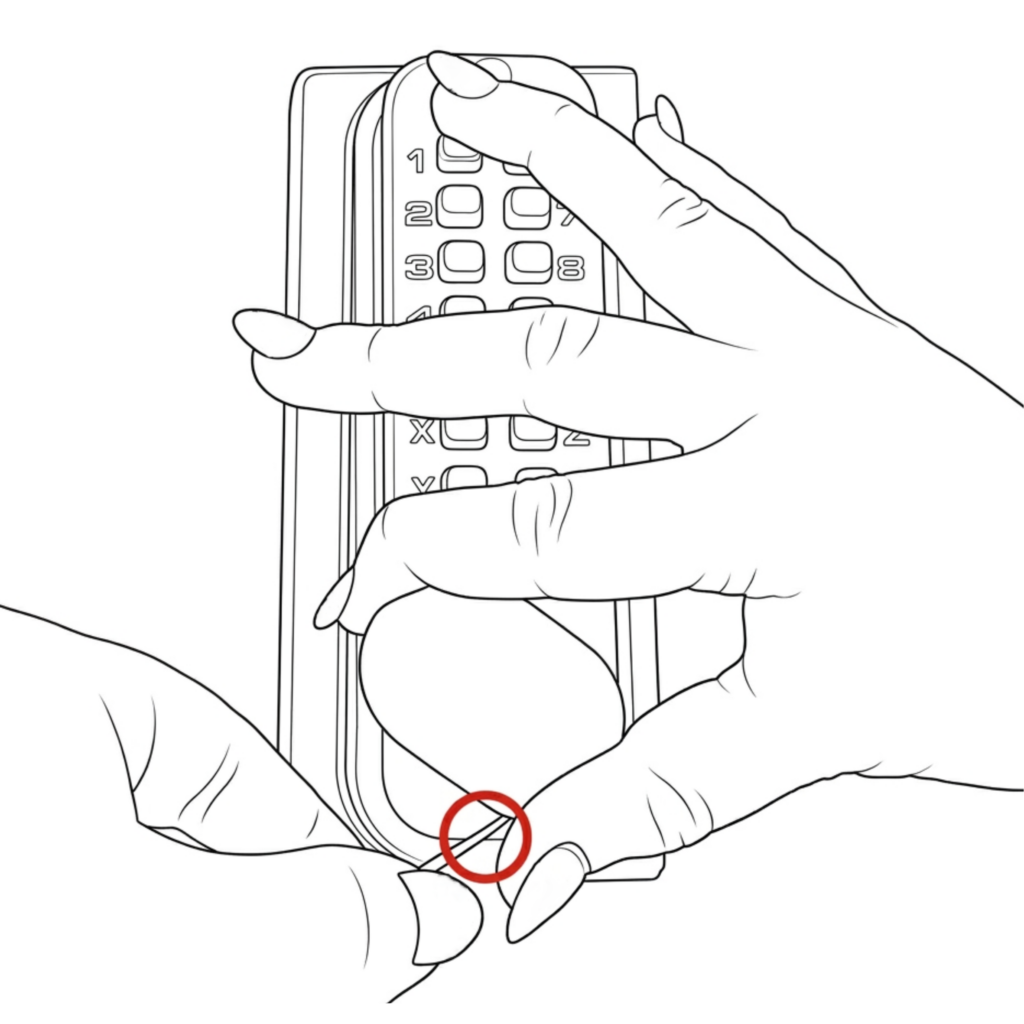
2. Enter the code and turn the handle,
then use a 2.5mm hex key to unscrew the bottom screw of the keypad.
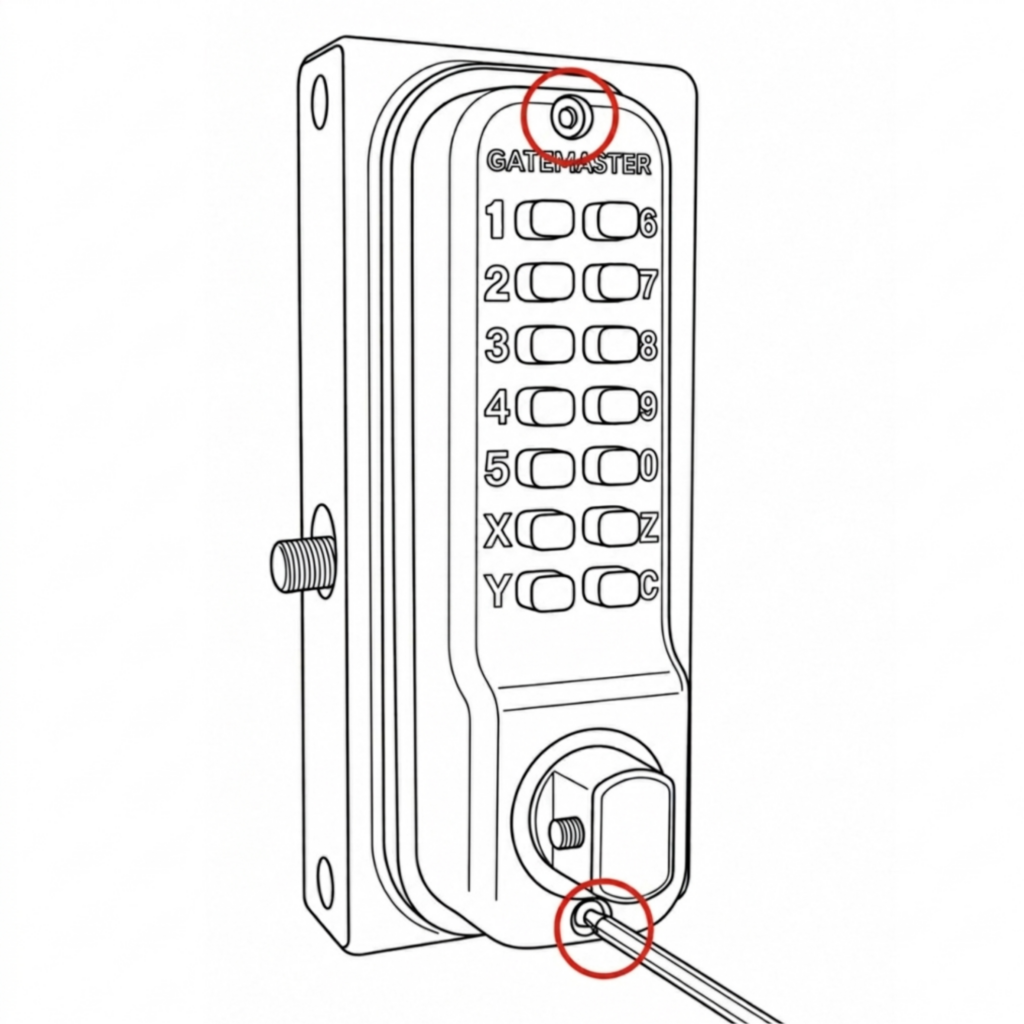
3. Refit the keypad on the correct side using the 3mm hex key, ensuring the flat spindle and rubber gaskets are in place. Use a 3mm hex key for the top screw & 2.5mm for the bottom screw.
Make sure that the keypad with screws is located on the inside of the gate.
Once complete, check that the code works correctly. Then follow the main installation instructions to fit the lock onto the gate.
BDGSD – Superlock 2.0 Code Delta Handle Single-Sided
Use the steps below to switch the handing on the BDGSD Superlock 2.0 Code Delta Handle Single-Sided lock before installation.
How to switch the handing on the BDGSD

- Using the 3mm hex key, unscrew the two screws located at the top and bottom.
2. Remove the keypad. On the inside handle, unscrew only the blue screws and screw it into the adjacent hole.
For left-handing, the screw should be in the right hole (image B) and for right-handing the screw should be in the left hole (image A).
3a. Refit the keypad using the 3mm hex key, ensuring the spindle and gaskets are in place.
3b. Using the 2.5mm hex key, screw on the handles to face the opposite way to the latch.
Once complete, check that the code and handle work correctly. Then follow the main installation instructions to fit the lock onto the gate.
BDGD – Superlock 2.0 Code Delta Handle Double-Sided
Use the steps below to switch the handing on the BDGD Superlock 2.0 Code Delta Handle Double-Sided lock before installation.
Make sure that after you change the handing that the keypad with screws is located on the inside of the gate for the lock to remain secure.
How to switch the handing on the BDGD
- Using the 3mm hex key, unscrew the two screws located at the top and bottom.
2. Remove and swap the keypads. Refit using the 3mm hex key, ensuring the flat spindle and rubber gaskets are in place.
3. Using the 2.5mm hex key, screw on the handles to face the opposite way to the latch.
Make sure that the keypad with screws is located on the inside of the gate.
Once complete, check that the code works correctly. Then follow the main installation instructions to fit the lock onto the gate.
BDGSRR – Superlock 2.0 Code RapidReset Single-Sided
Use the steps below to switch the handing on the BDGSRR Superlock 2.0 Code RapidReset Single-Sided lock before installation.
How to switch the handing on the BDGSRR

- Using the 3mm hex key, unscrew the two screws located at the top and bottom.
2. Remove the keypad. On the inside handle, unscrew ONLY the blue screw and screw it into the adjacent hole.
For left-handing, the screw should be in the right hole (image B) and for right-handing the screw should be in the left hole (image A).
3a. Refit the keypad using the 3mm hex key, ensuring the flat spindle and rubber gaskets are in place.
3b. Using the 2.5mm hex key, screw on the handles to face the opposite way to the latch.
Once complete, check that the code and handle work correctly. Then follow the main installation instructions to fit the lock onto the gate.
BDGRR – Superlock 2.0 Code RapidReset Double-Sided
Use the steps below to switch the handing on the BDGRR Superlock 2.0 Code RapidReset Double-Sided lock before installation.
Make sure that after you change the handing that the keypad with screws is located on the inside of the gate for the lock to remain secure.
How to switch the handing on the BDGRR
- Using the 3mm hex key, unscrew the two screws located at the top and bottom.
2. Remove and swap the keypads. Refit using the 3mm hex key, ensuring the flat spindle and rubber gaskets are in place.
3. Using the 2.5mm hex key, screw on the handles to face the opposite way to the latch.
Make sure that the keypad with screws is located on the inside of the gate.
Once complete, check that the code works correctly. Then follow the main installation instructions to fit the lock onto the gate.
BQDG – Superlock 2.0 Code Quick-Exit
Use the steps below to switch the handing on the BQDG Superlock 2.0 Code Quick-Exit lock before installation.
How to switch the handing on the BQDG
- Using the 2.5mm hex key, unscrew the two screws located at the top and bottom.

2. Flip the push pad 180° vertically and mount on the opposite side. Make sure to push the latch thread in before refitting the push pad.
3. Refit the keypad using the 2.5mm hex key, ensuring the flat spindle and rubber gaskets are in place. Check the keypad is positioned on the correct side for the required handing.
Once completed, check that the code and push pad works correctly. Then follow the main installation instructions to fit the lock onto the gate.
BQDGRR – Superlock 2.0 Code RapidReset Quick-Exit
Use the steps below to switch the handing on the BQDGRR Superlock 2.0 Code RapidReset Quick-Exit lock before installation.
How to switch the handing on the BQDGRR
- Using the 2.5mm hex key, unscrew the two screws located at the top and bottom.
2. Flip the push pad 180° vertically and mount on the opposite side. Make sure to push the latch thread in before refitting the push pad.
3a. Refit the keypad from the rear using the 2.5mm hex key, ensuring the flat spindle and rubber gaskets are in place. 3b. Then fit the keypad handles with the hex key, ensuring it faces the opposite direction to the latch.
Once completed, check that the push pad works correctly. Then follow the main installation instructions to fit the lock onto the gate.
BQK – Superlock 2.0 Keyed Quick-Exit
Use the steps below to switch the handing on the BQK Superlock 2.0 Keyed Quick-Exit lock before installation.
How to switch the handing on the BQK

- Using the 2.5mm hex key, unscrew the two screws located at the top and bottom. Remove the push pad and front plate.
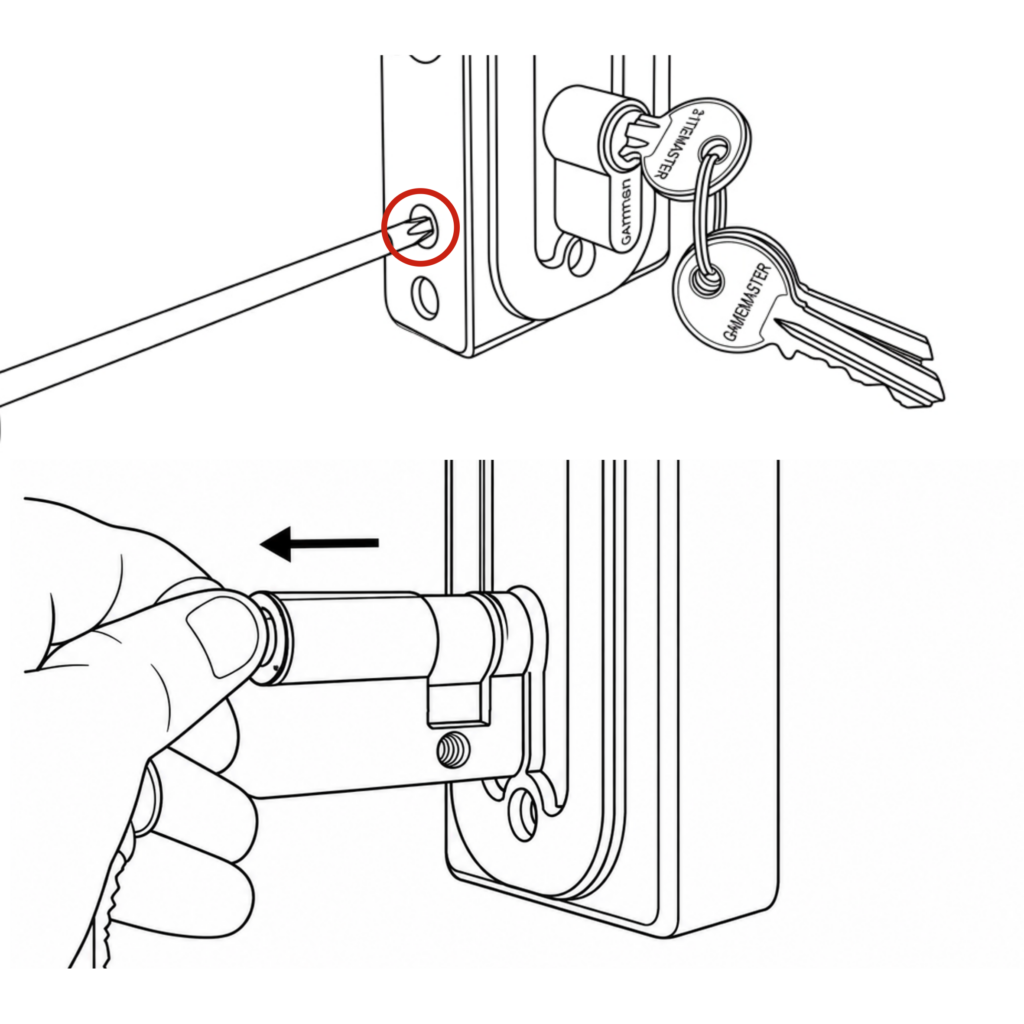
2. Using a screwdriver, unscrew the screw located on the forend plate. Remove the eurocylinder from the casing by inserting the keys and turning them to either 11 or 1 o’clock. Pull the eurocylinder out and refit on the other side.
3. Rotate the push pad 180° and fit it on the opposite side. Make sure to push the latch thread in before refitting the push pad.
4. Screw the screws back in and refit the push pad using the 2.5mm hex key, ensuring the flat spindle and rubber gaskets are in place. Check that the push pad is on the correct side for the required handing.
Once completed, check that the push pad works correctly. Then follow the main installation instructions to fit the lock onto the gate.
BQ-NA – Superlock 2.0 Quick-Exit No Access
Use the steps below to switch the handing on the BQ-NA Superlock 2.0 Quick-Exit No Access lock before installation.
How to switch the handing on the BQ-NA
- Using the 2.5mm hex key, unscrew the two screws located at the top and bottom.
2. Flip the push pad 180° vertically and mount on the opposite side. Make sure to push the latch thread in before refitting the push pad.
3. Refit the push pad using the 2.5mm hex key, ensuring the flat spindle and rubber gaskets are in place. Check the push pad is positioned correctly for the required handing.
Once completed, check that the push pad works correctly. Then follow the main installation instructions to fit the lock onto the gate.
BDGSW – Superlock 2.0 Code Single-Sided Surface Mounted
Use the steps below to switch the handing on the BDGSW Superlock 2.0 RapidReset Surface-Mounted Single-Sided lock before installation.
How to switch the handing on the BDGSW
- Using the 3mm hex key, unscrew the two screws located at the top and bottom.
2. Remove the keypad and on the inside handle unscrew only the blue screw. Screw it into the adjacent hole.
3. Refit the keypad using the 3mm hex key, ensuring the flat spindle and rubber gaskets are in place.
Once completed, check that the handle works properly. Then follow the main installation instructions to fit the lock onto the gate.
BDGW – Superlock 2.0 Code Double-Sided Surface Mounted
Use the steps below to switch the handing on the BDGW Superlock 2.0 Surface-Mounted Double-Sided lock before installation.
Make sure that after you change the handing that the keypad with screws is located on the inside of the gate for the lock to remain secure.
How to change the handing on the BDGW
- Using the 3mm hex key, unscrew the top screw of the inside keypad.
2. Enter the code and turn the handle and then use a 2.5mm hex key to unscrew the bottom screw. Remove the keypad and rear fixing plate.
3. Refit the keypad and fixing plate on the correct sides using the hex keys, ensuring the flat spindle and rubber gaskets are in place. Use the 3mm hex key for the top screw & the 2.5mm hex key for the bottom.
Make sure that the keypad with screws is located on the inside of the gate.
Once completed, check that the code works properly. Then follow the main installation instructions to fit the lock onto the gate.
BDGSWRR – Superlock 2.0 Code RapidReset Single-Sided Surface Mounted
Use the steps below to switch the handing on the BDGSWRR Superlock 2.0 RapidReset Surface-Mounted Single-Sided lock before installation.
How to switch the handing on the BDGSWRR
- Using the 3mm hex key, unscrew the two screws located at the top and bottom.
2. Remove the keypad and on the inside handle unscrew only the blue screw. Screw it into the adjacent hole.
3a. Refit the keypad using the 3mm hex key, ensuring the flat spindle and rubber gaskets are in place.
3b. Using the 2.5mm hex key, screw on the handles to face the opposite way to the latch.
Once completed, check that the handle works properly. Then follow the main installation instructions to fit the lock onto the gate.
BDGWRR – Superlock 2.0 Code RapidReset Double-Sided Surface Mounted
Use the step below to switch the handing on the BDGWRR Superlock 2.0 RapidReset Surface-Mounted Double-Sided lock before installation.
How to change the handing on the BDGWRR
Using the 3mm hex key, unscrew the top screw of the inside keypad.
2. Remove and swap the keypads. Refit using the 3mm hex key, ensuring the flat spindle and rubber gaskets are correctly in place.
3. Using the 2.5mm hex key, screw on the handles to face the opposite way to the latch.
Make sure that the keypad with screws is located on the inside of the gate.
Once completed, check that the code works properly. Then follow the main installation instructions to fit the lock onto the gate.
FAQ’s
Can I change the handing after I have installed the lock onto the gate?
Yes, you can change the handing after installation without removing the lock from the gate. Please make sure you have access from inside the gate to change the handing.
The eurocylinder is not aligning with the screw. What do I do?
If the eurocylinder on the BQK does not align when you insert it back into the casing check that the internal components are fitted correctly into the case. Hold the internal components in place and your eurocylinder should go in. Make sure to take the key out of the eurocylinder as this secures it in place and ensures it does not fall out. If the eurocylidner is still getting stuck, contact our sales team for further assistance.
The latch thread is stuck inside the lock casing what do I do?
If your latch thread becomes stuck inside while pushing it in to refit the push pad onto the lock, gently ease it back out with your finger. It should then return to its correct position automatically.
Alternatively, you can install the latchbolt before you start changing the handing as this may prevent the latch thread from getting stuck in the casing.
If your latchbolt thread is stuck, please contact our support team for further assistance.
My code and or handle/push pad does not work. What do I do?
Check that the code is correct and make sure the spindle is in place.
Please retrace your steps and try changing the handing again. Double-check that the code you are putting in is correct and that the flat spindle is in the correct place. If you are still having difficulty, please get in touch with our sales team for further support.
On the double-sided gate lock, which keypad should be on the inside?
For our double-sided gate locks, make sure the keypad with the screws is on the inside of the gate. If the keypad is fitted on the outside, it will be accessible from the public side of the gate, increasing the risk of tampering or removal.

